Showing posts with label Fathers Day. Show all posts

Sunday, 16 June 2013

Fathers Day Card

Happy Fathers Day!

Here is the card I made for my dad this year.


It was really easy to make, I just cut out all the shapes using some of the multitudes of my craft paper stash (there's plenty more where that came from) and glued them on using PVA. I then added some sequins and a bit of ribbon which I managed to twist and which dried on wonky, but never mind. It (hopefully) adds to the shabby chic theme.
 
My dad really is a star, so he definitely deserves to hear it! he's been very good as my handy man around the house. I helped him to give the garden a fabulous make over a few years ago, and he's come and sorted out a multitude of small household jobs for me too. He's always very supportive, (sometimes over protective) and gives me plenty of advice (sometimes too much) but he has always been there for me and always will be when I need him again. Thanks dad for being a star!

Happy Fathers Day!

You might also like
Fathers Day Card:2012
Friday Finds: Rugby
Free Cross Stitch Chart: Dad Bookmark
Project Tutorial: Embroidered Birthday Card
Friday Finds: Movember

Wednesday, 29 May 2013

Free Chart: Dad Bookmark

It's fathers day on 16th June, so that gives you plenty of time to stitch this free oak leaf dad bookmark chart. It would also make a great birthday present or Christmas present for your father. This cross stitch bookmark pattern is perfect for a beginner as it only uses whole cross stitches, click for a cross stitch tutorial.


You will need

At least 8.5" length of a 2.5" wide 14 count aida band. (Design size is 7.1" x 2.1")
Needle
Felt (for backing the cross stitch)
Fabric Glue
Tassel (Optional)

Embroidery Threads


Stitch the design and trim the aida band to 4cm longer than the size of the bookmark, ensuring that the design is centralised.

Carefully fold over a seam of 2cm at each end, stitch or glue (using a clear drying craft glue or fabric glue) to secure.

Trim the felt to the size of the bookmark.

If you want your bookmark to have a tassel, carefully position it in the middle of one end of the bookmark and stitch to secure it in place.

Glue (or carefully stitch) the felt backing in place. Congratulations! You've just made your dad a lovely cross stitch bookmark.

Happy Stitching!

You might also like
Free cross Stitch Chart: Fathers Day Card
Friday Finds: Autumn Leaves
Hardanger Finish: Purple Delight
Happy St Georges Day: Cross Stitch Charts
Friday Finds: Gadget Accessories


Wednesday, 8 May 2013

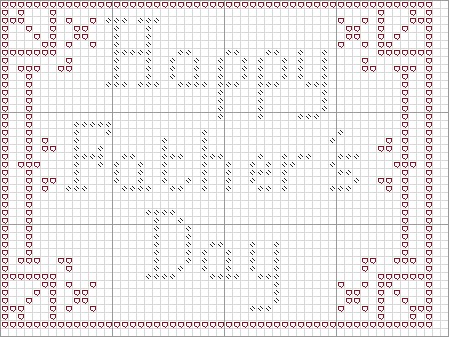
Free Chart: Fathers Day Card

This year Fathers Day is on June 16th, so you have plenty of time to make this free cross stitch chart into a fantastic hand embroidered card for him. Don't worry if you're a beginner, as this chart uses only full cross stitches. It only uses 2 colours, although you could use any colours you like. That's the advantage of a pattern, so dig out your leftover embroidery threads and get stitching!


The finished chart will be 4" (10.2cm) x 3" (7.6cm) in size when stitched on 14 count aida. You will need approx. 110cm length of thread for the black (writing) and approx. 180cm length of thread for the maroon (pattern). To make it look funky why not use a variated thread? Or a coloured aida background?


To finish it why not head over to my Project Tutorials to see a couple of different techniques I have used to finish off cards.
 
Happy Stitching!
 
 
You might also like


Tuesday, 9 April 2013

Project Tutorial: Bicycle Card

I made this embroidered metallic blue bike card for my dad's birthday. As it is a blank card is suitable to be used for any occasion, such as Fathers Day, Birthdays, or even a Congratulations card! You could easily use different colours to customise it.  What do you think? It's easy to do, and you could easily use this method to create your own designs too.
You will need
Embroidery threads (I used DMC 310 black and some metallic blue thread)
Even weave (I used 28 count)
Card (I used a pre-folded card that was 6"x4")
Spare Card for the border
Clear drying glue e.g. PVA or double sided tape.
First of all, you can print this chart out to the size you require for your card. I used a bike length of 10cm. (alternatively you can draw your own. TIP: use pencil first so you can rub it out if you go wrong before drawing over it in a black pen)
The next step is easy. Place the even weave over your design. You should be able to see the outline of the bike. Using a fabric pen if you have one, (or a pencil if you don't) carefully trace the design onto the even weave, making sure you don't move the design.
Now it's time to get stitching! Stitch over the lines of the design beginning with the bicycle frame. I used 2 strands of black thread and 3 strands of metallic blue thread (because it was quite thin, 2 strands of normal embroidery cotton will be fine).
Handles: Satin Stitch
Seat: Padded Satin Stitch
Frame: Satin Stitch
Wheels: Chain Stitch
To give the card a nice finish, I then trimmed down some spare card to 5.5" x3.5" to give a border around the frame, and then cut out an aperture size of 5"x3".
Now you're ready to assemble your card.
First, trim down your bike design to 5.5" x 3.5", being careful to ensure that the bike is central, so it will fit in the card border without any overhanging. (You may need to trim it slightly smaller due to the fabric stretching) Ensure there is an overlap of even weave and card. Carefully glue the bicycle design to the green card using either a clear drying glue or double sided sticky tape, and leave to dry.
Once dry, carefully glue the bike and border to the card, ensuring it is centrally positioned. It should look something like this once completed!
Alternatives: Use a smaller design/ larger card and place the design at an angle.
Add embellishments in the form of ribbons, bows, buttons, sequins, e.t.c.
Happy Stitching!
You might also like

Friday, 15 March 2013

Friday Finds: Rugby

For those of you who don't know it's a BIG game in the Rugby world tomorrow. Well 3 to be precise in the 6 Nations. They are Italy v Ireland, France v Scotland, and England v Wales. Now, I must admit that I am not a huge Rugby fan, however my best friend Rhian is. being half English and half Welsh she can't really lose out whichever way the England v Wales game goes, however she has been brought up supporting Wales, (owing to her Rugby fan dad being the Welsh parent) despite growing up in the Midlands. Another good reason to promote Rugby as my Friday Finds theme for this week, is the little town of Rugby (Where William Webb Ellis ran with a ball during a game of football at Rugby School) in Warwickshire is my birth city. I lived in a village about 6 miles away until i left to go to University at 18. I regularly go back though, as my parents are in the same house and my sister has recently bought one in Rugby, so I have a homely fondness for the little market town. So, without further ado, here are some fantastic Rugby paraphernalia. (The game, not the town, that wouldn't be quite as exciting.)


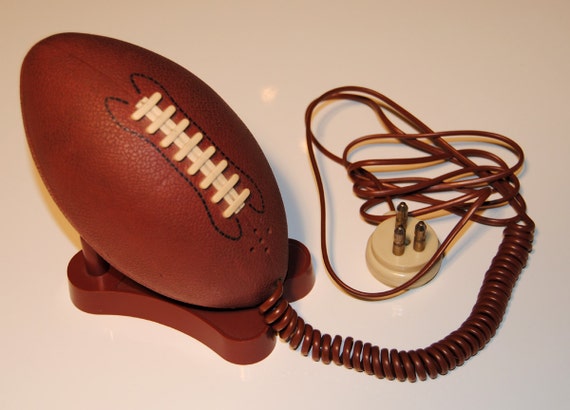
Le Pulcioserie's vintage Rugby ball phone is without a doubt the most unusual Rugby paraphernalia I found in my Etsy search. It a fantastic unique item that is perfect for the quirky Rugby fan.


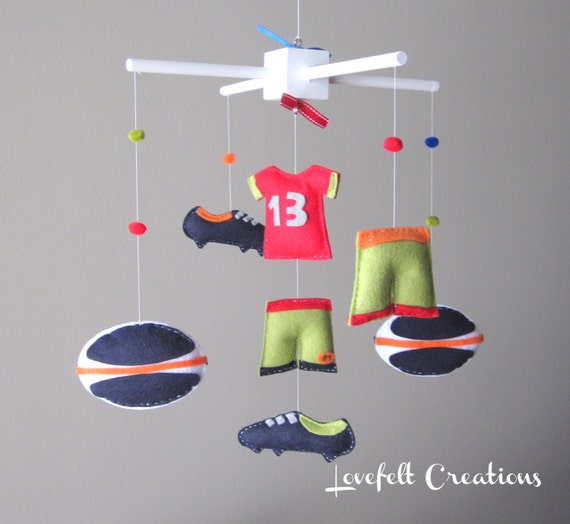
To encourage your children while they're young head over to Love Felt XOXO for this cute Rugby baby mobile. It's one all the babies, (and their Rugby fan dad) will love.


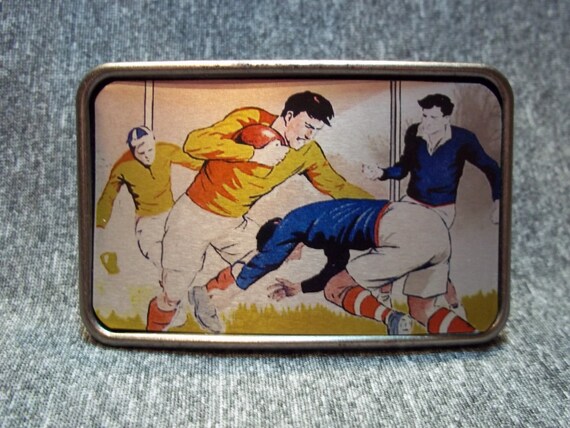
If you prefer to show your sportiness by wearing Rugby clothes, then step away from the Rugby shirt for a moment and try out this vintage Rugby game belt buckle by Bear Wear Designs. The colours and design remind me of comic books.


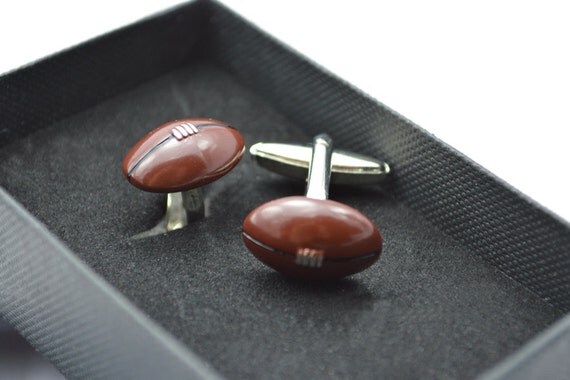
Back to a nice pair of balls now, (Rugby balls, what are you thinking!) that are perfect for the smartly dressed man. Daves Disco is responsible for these fun cuff links, and many other sports are also available.


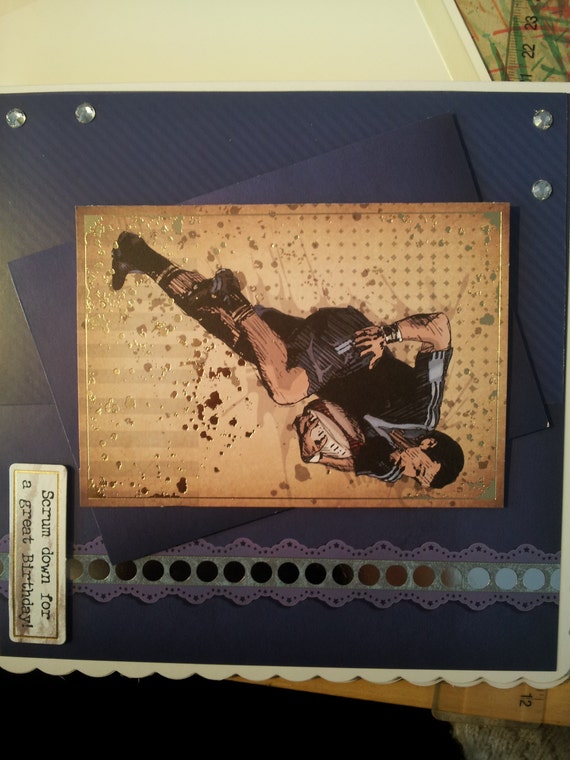
 Kerry Kards made this awesome Rugby birthday card,  which you can personalise for free! What a great way to say happy birthday to you're favourite Rugby fan!

Happy Shopping


You might also like
Friday Finds: Cars
Craft Fairs and Berlin
St Paddy's Day
Friday Finds: Wales
Fathers Day Card

Saturday, 16 June 2012

Fathers Day Card

It's Fathers Day tomorrow, so best wishes to all dad's out there, I hope you all have a lovely day.

My dad is on holiday this week, (I hope there's some nice weather for him and mum, instead of this constant rain and grey skies engulfing us). I am however, seeing them next week, along with my sister and her boyfriend who have just moved into a flat together. I'm very excited about seeing them all, and being a guest of my sister for a change! It'll be lovely for us all to be together, and have a good old catch up. It doesn't happen as often as I like, as I live in Sheffield and they live in Northamptonshire, especially as Chris (as a pub manager) works at weekends, and I also have to 'feed' my cells some weekends too.

One 'advantage' of Chris working evenings and weekends however, is that I have plenty of time at home alone to spend stitching away in front of trashy TV shows (like don't tell the bride) and girly chick flicks that he, like most men, try to avoid as much as possible. Anyway, This has given me time to design and make a new cross stitch card for my dad this Fathers Day.

First of all I created the design. I kept it simple, with the classic 'Happy Father's Day' message, and created a simple geometric border to frame it beautifully. This has the added advantage of the card having a more masculine appeal; it's easy for cross stitch to be 'girly' with flowers, hearts, and cute animal designs, but harder to create masculine designs that aren't all about football, cars, or beer, none of which is relevant design material for my father, who prefers walking and cycling. What do you think?

Last time I made a card I simply trimmed and glued the design onto the card. This worked ok, but I wanted to try something different this time, so I carefully measured the size of the design, and cut an aperture out of the front of the card, so that the cross stitch could be glued to the inside of the card, with the design showing through to give it a neat edge, and a more professional finish. As I used green card, I used a green pencil to mark the aperture before carefully cutting it out. Next, I trimmed the cross stitch to give a small overlap, and after carefully checking the positioning and aperture size, glued it into place.

It definitely has a cleaner finish when on display.  However, I felt that it needed a little something still, to bring a bit more interest to the card. After a quick search through my stash of crafty items, I decided to add a bit of sparkle using a variety of different sized gold sequins. I just as easily could have trimmed a ribbon and added that, or cut a card border using a different colour. However the glitz won out, and after selecting the sequins and positioning them on the card I carefully glued them in place with the aid of a match to try and prevent getting glue everywhere! It proved mostly successful, and as I was using a clear drying craft glue it didn't matter too much where some glue was visible.

The inside of the card, however, was less neat as the back of the stitching could easily be seen. to hide this and neaten it up, I trimmed a sheet of pale green paper to a size just smaller than the card, and folded it in half. I then carefully glued it in place along the fold and around the edges of the paper, ensuring that the reverse of the cross stitch was covered. After leaving it overnight to dry, and having written a message to my dad inside, the card was finished and good to go. What do you think?


Happy Fathers Day!


Monday, 11 June 2012

Fathers Day Ideas!

If you've been near any gift shops or walked down a supermarket card aisle, you'll already know that its Fathers Day on Sunday. If. like me, you always struggle to decide what to get for your dad, then here are some lovely, unique and crafty items he might like...

Handmade by MK works wonders with felt. If you're looking for a little special something for an outdoors, veichel loving dad, then these Tractor keyrings are perfect! There is also a green version, along with camper vans, owls, elephants and many more colourful designs.  


If your dad loves his tea, but leaves 'rings' everywhere, then these jazzy mosaic coaster by Diomo Glass are the perfect solution. They are pretty but masculine, and you can never have too many! Diomo Glass don't just stop at coasters, they sell tea light coasters, glass lanterns and sun catchers amongst others.


For 'proud to be British' fathers take a peek at this card by Yammas Cards and crafts. The design is perfect for all London loving dad's. It is particularly apt if your dad will be avidly watching the Olympics with the carefully chosen border. Don't forget to check out their other fabulous cards while your at it. 


Fathers day is for your dad, and his family, which Paper Panda beautifuly reminds us with this intricate framed paper cut out. I thinks it's fabulous, especialy how the tree creates a frame for the family featured. Paper Panda also produces other pictures, and lovely sayings.


This colourful sun catcher is a creation by Busy Lizzy and is perfect for the boy that all grown men still are at heart. The bright design will make a perfect window adornment for any retreat your father could choose, be it a study, his bedroom, or even the garden shed. Busy Lizzy's  talent also extends to buterflies, sun rising over hills, and many more.


I hope this has given you a few ideas! It is definately harder finding items for men than it is for women, I guess they tend to prefer more useful items, or electronic gadgets rather then pretty ornaments. However, with a bit of searching you can find a wide range of items, perfect for your dad this Fathers Day.