Showing posts with label free chart. Show all posts

Friday, 29 November 2013

Free Chart: Wedding Card

My sister Jessica recently got married to her lovely new husband, Danny after 3 1/2 years together. She asked me to be her bridesmaid, which was lovely of her and I really enjoyed it, (despite the stress of helping plan a wedding, and making sure everything runs smoothly. She tied the knot at Brownsover Hall Hotel, which was an absolutely beautiful setting. The whole day was lovely, (although over to quickly). As she's my favouritist sister in the whole wide world (and my only one) there was no question that I wanted to make her a special wedding card for the big day, which, now that it is all over, I am sharing with you!


I used a dark red and gold for the heart border, and a sparling champagne coloured thread for the champagne glasses. I sued 1 strand of thread for all the stitching, including the backstitch. I stitched this on a 22 count even weave, which gave a finished size of 10.5cm (4") x 15.5cm (6"), perfect for an A4 card. On 14count aida the finished size is 16cm (6.5") x 24cm (9.5"). For techniques on finishing the card, please see my Project Tutorials page. I used the same technique as I did for the embroidered bicycle card but I used gold card instead, with a pearlised red card border. Unfortunately I don't have a photo of the finished card, I didn't get round to making it until a few days before the wedding!
 
Happy stitching
 
You might also like
 

Wednesday, 29 May 2013

Free Chart: Dad Bookmark

It's fathers day on 16th June, so that gives you plenty of time to stitch this free oak leaf dad bookmark chart. It would also make a great birthday present or Christmas present for your father. This cross stitch bookmark pattern is perfect for a beginner as it only uses whole cross stitches, click for a cross stitch tutorial.


You will need

At least 8.5" length of a 2.5" wide 14 count aida band. (Design size is 7.1" x 2.1")
Needle
Felt (for backing the cross stitch)
Fabric Glue
Tassel (Optional)

Embroidery Threads


Stitch the design and trim the aida band to 4cm longer than the size of the bookmark, ensuring that the design is centralised.

Carefully fold over a seam of 2cm at each end, stitch or glue (using a clear drying craft glue or fabric glue) to secure.

Trim the felt to the size of the bookmark.

If you want your bookmark to have a tassel, carefully position it in the middle of one end of the bookmark and stitch to secure it in place.

Glue (or carefully stitch) the felt backing in place. Congratulations! You've just made your dad a lovely cross stitch bookmark.

Happy Stitching!

You might also like
Free cross Stitch Chart: Fathers Day Card
Friday Finds: Autumn Leaves
Hardanger Finish: Purple Delight
Happy St Georges Day: Cross Stitch Charts
Friday Finds: Gadget Accessories


Wednesday, 8 May 2013

Free Chart: Fathers Day Card

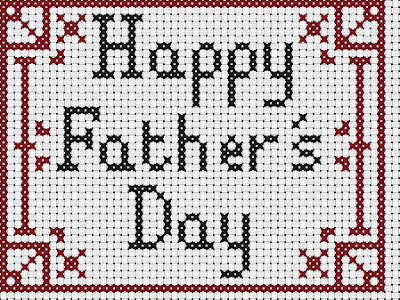
This year Fathers Day is on June 16th, so you have plenty of time to make this free cross stitch chart into a fantastic hand embroidered card for him. Don't worry if you're a beginner, as this chart uses only full cross stitches. It only uses 2 colours, although you could use any colours you like. That's the advantage of a pattern, so dig out your leftover embroidery threads and get stitching!


The finished chart will be 4" (10.2cm) x 3" (7.6cm) in size when stitched on 14 count aida. You will need approx. 110cm length of thread for the black (writing) and approx. 180cm length of thread for the maroon (pattern). To make it look funky why not use a variated thread? Or a coloured aida background?


To finish it why not head over to my Project Tutorials to see a couple of different techniques I have used to finish off cards.
 
Happy Stitching!
 
 
You might also like


Tuesday, 9 April 2013

Project Tutorial: Bicycle Card

I made this embroidered metallic blue bike card for my dad's birthday. As it is a blank card is suitable to be used for any occasion, such as Fathers Day, Birthdays, or even a Congratulations card! You could easily use different colours to customise it.  What do you think? It's easy to do, and you could easily use this method to create your own designs too.
You will need
Embroidery threads (I used DMC 310 black and some metallic blue thread)
Even weave (I used 28 count)
Card (I used a pre-folded card that was 6"x4")
Spare Card for the border
Clear drying glue e.g. PVA or double sided tape.
First of all, you can print this chart out to the size you require for your card. I used a bike length of 10cm. (alternatively you can draw your own. TIP: use pencil first so you can rub it out if you go wrong before drawing over it in a black pen)
The next step is easy. Place the even weave over your design. You should be able to see the outline of the bike. Using a fabric pen if you have one, (or a pencil if you don't) carefully trace the design onto the even weave, making sure you don't move the design.
Now it's time to get stitching! Stitch over the lines of the design beginning with the bicycle frame. I used 2 strands of black thread and 3 strands of metallic blue thread (because it was quite thin, 2 strands of normal embroidery cotton will be fine).
Handles: Satin Stitch
Seat: Padded Satin Stitch
Frame: Satin Stitch
Wheels: Chain Stitch
To give the card a nice finish, I then trimmed down some spare card to 5.5" x3.5" to give a border around the frame, and then cut out an aperture size of 5"x3".
Now you're ready to assemble your card.
First, trim down your bike design to 5.5" x 3.5", being careful to ensure that the bike is central, so it will fit in the card border without any overhanging. (You may need to trim it slightly smaller due to the fabric stretching) Ensure there is an overlap of even weave and card. Carefully glue the bicycle design to the green card using either a clear drying glue or double sided sticky tape, and leave to dry.
Once dry, carefully glue the bike and border to the card, ensuring it is centrally positioned. It should look something like this once completed!
Alternatives: Use a smaller design/ larger card and place the design at an angle.
Add embellishments in the form of ribbons, bows, buttons, sequins, e.t.c.
Happy Stitching!
You might also like

Monday, 4 March 2013

Project Tutorial: Mothers Day Card

Naturally for Mothers Day next Sunday I had to design and make a card. With new stitch inspiration from my new Encyclopaedia of Stitches in the form of Rosebud Stitch, flowers were the obvious choice. It was easy to think of a slightly corny saying for the card. Besides, it might be corny but t's true, I wouldn't change my mum for anything! So here's the card I made, which you are more than welcome to reproduce for your own mum. Because it doesn't mention mothers day in the saying, you could use it as a birthday card for your mother too. I'm quite proud with the card, it's pretty easy and simple to make, once you've got the hang of all the different stitches!
 
Here's the chart I've developed. I stitched it using 2 strands of embroidery cotton for each colour, on 14 count pale blue aida using the DMC threads and beads stated below the chart, but if, like me, you have a stash of embroidery threads then just use whatever is too hand, or tailor it using your mums' favourite colours! The finished Chart size is approx. 3" (7.5cm) x 4" (10cm). Remember to cut the aida at least 2" bigger.


Writing: DMC 552
Basket: DMC420
Flower centres: DMC 445 (rosebud and spikey flower)
Flower centre, Daisy: Mill Hill yellow seed beads (can substitute with French knots in DMC 445)
Rosebud: DMC Colour Variations: 4180
Daisy: DMC Light effects 5200
Spikey Flower: DMC Perle 8 colour 99
Leaves/ Stems: DMC 320
 
How to Stitch:
 
Writing: Mostly Backstitch with some Cross Stitch
Basket: All Backstitch
Rosebud: Use Rose Stitch with a French Knot centre
Spiky Flower: Use Satin Stitch for the centre, with Backstitch petals ending in a French knot.
Daisy: Use Lazy Daisy Stitch for the petals, add a seed bead or French Knot for the centre.
Leaves: Use small Lazy Daisy stitch.
Stems: Use Backstitch for the Rose and Daisies, and Stem Stitch for the Spiky flowers.
 
Once you've finished stitching it, it should look something like this! From here on it's easy, all you need to do is trim down the cross stitch to the required size. (I left 5 squares either side and 7 squares above and below) and simple glue it onto the card, using either a clear drying adhesive such as PVA or double sided sticky tape. Just make sure you have glued down all the edges to prevent fraying.
As an alternative, you may wish to fray the edges, in which case leave an extra couple of squares all the way round after trimming the cross stitch down, and gently and carefully pull away the threads for those extra 2 squares. You can embellish the card or finish it in any way you want. Write your own personal message inside the card, and hey presto, you've made a simple embroidery mothers day card! She will love it as you have taken the time and effort to make it!

Wednesday, 19 December 2012

Free Chart: Mum Roses Bookmark

As it's the festive season I've got a little present for you, a Mum cross stitch bookmark with Roses. It makes a lovely gift, mum's in particular always appreciate something that you yourself have lovingly spent time making for them. Even better, This design can be stitched in a variety of different colours; I have made a pink one, yellow one and purple one for various people to give to their mum as a present. If you've never tried cross stitch before, you can find a tutorial here.


What do you think?

The finished bookmark is 2"x7" (5cm x 18cm) approx with the tassel as extra. It was stitched onto a 2" wide 14 count Aida band, available from a range of suppliers (I tend to use sew and so but there are plenty of others). I have used 2 strands of DMC threads for the stitching, and you will be pleased to know that only full cross stitches are used, making it perfect for beginners. Here's the chart in colour symbols.


Simply print out the chart and start stitching!


Happy Stitching


You might also like
Personalised and Proud
Friday Finds: Mothers Day
WIP: Peak District Photo Conversion
Project Tutorial: Embroidered Mothers Day Card
Fridy Finds: New Sheets


Wednesday, 18 April 2012

Happy Birthday Chart!

It was my dad's birthday a few weeks ago, so I decided to have a go at designing and making a cross stitch card for him. The biggest thing I've designed previously were name bookmarks, I've mostly only designed small motifs for my cross stitch jewellery.

The first step was deciding what to design. I definitely wanted the words happy Birthday on the card, so I started there. Easy!

My dad loves gardening, he's always grown vegetables and flowers, and gardening is his job so it was the obvious choice of subject! My first idea was to do some garden tools, but unfortunately putting the picture in my head down onto a cross stitch chart is a lot harder than it seems, and I underestimated the space needed. Also, designing a spade complete with mud and space for other tools is harder than it seemed, and would look a bit boring. Time to come up with another design...

After a little pondering, I decided to do a flowerpot. It may not be the most manly of designs, but it is most definitely appropriate for my dad, so after a little bit of designing with the help of my Royal School Of Needlework software and my DMC thread colour chart, I came up with a basic design. I did a little tinkering, such as adding the butterfly and changing the flower colours from red and pink to blue and purple, before coming with the finished chart design. What do you think?!


I stitched the chart using cross stitch, back stitch and lazy daisy stitch for the petals and leaves. I used seed bead detail for the flower centres, and butterfly body. After a bit of fraying to give it a pretty edge, I glued the cross stitch to a green card using clear drying craft glue, and voila! The card was finished.


My dad liked it, so It was definitely a success! What do you think?

You might also like
Scotland Cross Stitch
3D Cross Stitch Garden
Free Cross Stitch Chart: Dad Bookmark
Friday Finds: Rugby
Work in Progress: Peak District Photo Conversion